You need to know this before running Google Shopping ads
Now many people run Google ads will prefer shopping ads, in fact, does not represent search ads, display ads, video ads are useless, but compared to these traditional shopping ads, shopping ads have: excellent display location, simple settings, good conversion rate and so on advantages.
First, where shopping ads appear
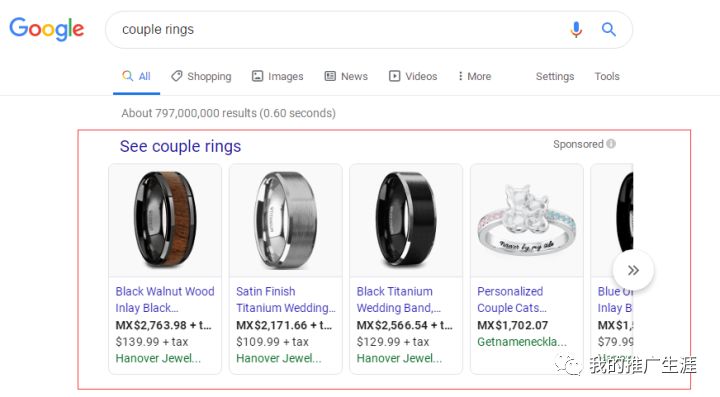
In general, shopping ads appear at the top of the search results page and show the price and image of the product, which is very attractive to users.
Types of shopping ads: product ads, window ads.
Product ads: Only one product is shown, and Google charges a pc per click.
Window ads: Show three products at the same time, Google charges a fee for a single interaction with cpe, which only charges when a user browses for more than 10 seconds or clicks into your site.
Second, the preparation of shopping ads
1, you first need to sign up for Google Merchant Center
You can only run shopping ads if you upload your business information and product data through The Mercant Center.
Open the official website:https://www.google.com/retail/solutions/merchant-center
Click to log in, use the same Google ad account, and fill in some information (this step is not detailed).
2, fill in the business information, verify the website
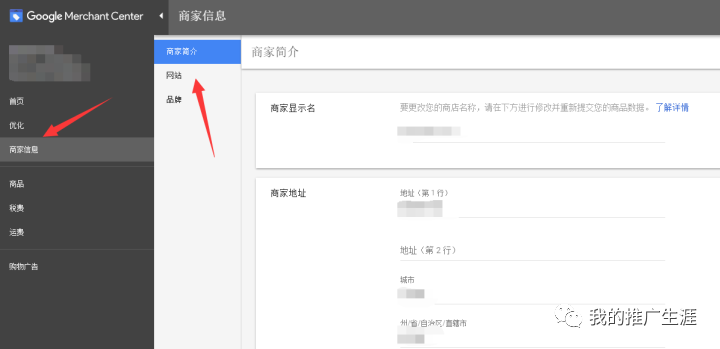
Once we're backstage at Mercant Center, we're going to improve our business information first.
Business profile: Fill in the business name (site name or website URL), business address.
Website: Here is the focus needs to verify your site, first enter your website URL, click Save.
There are three ways to verify your website: Google Analytics accounts, track code manager containers, and access my servers.
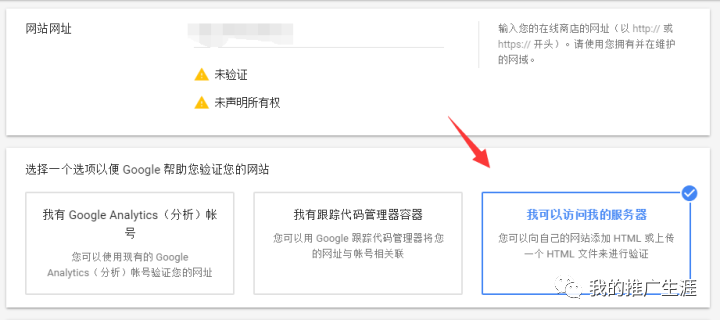
Personally, I feel that the easiest thing to do is to use access to my server, click, and there are two ways.
Add HTML tags to my home page: Like Shopify, Wordpress, etc. are suitable for this method. Here's an example of a Shopify store: three verification methods, select "I can access my server" and then "Add HTML tags to my home page."

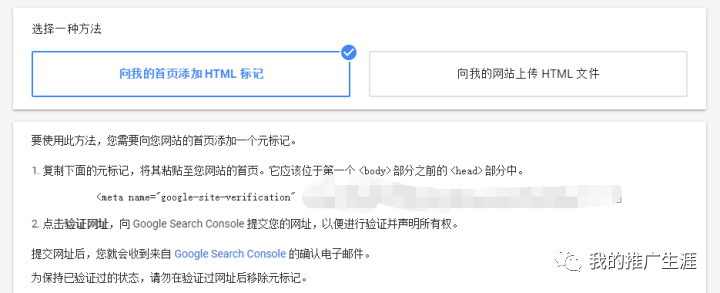
Log in to the back of the Shopify store and click "Online Store," "Template," "Edit Code"
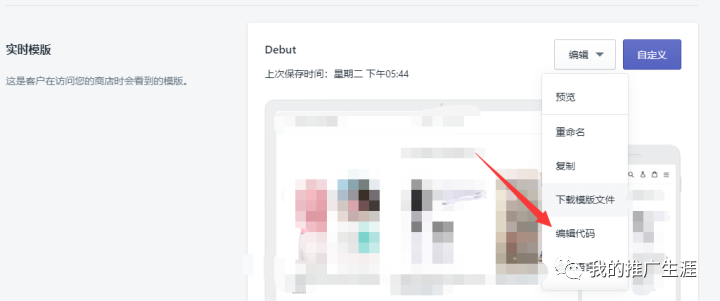
Then click on the "theme.liquid" file and put the code copied by Mechant Center next to the head.

Want to post HTML files on my website: For your own foreign trade website (e.g. wordpress, opencart, etc.), you need to be able to access the website server root.

Let me use wordpress as an example for both "Add HTML tags to my home page" and "Upload HTML files to my website".
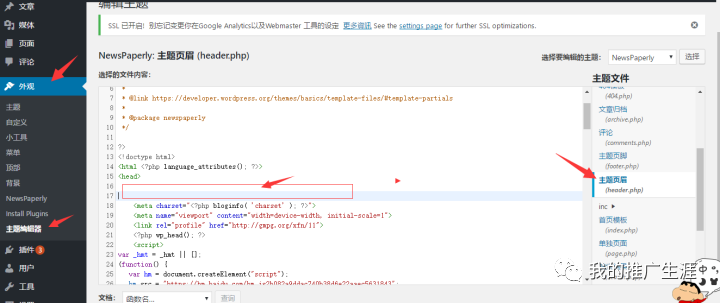
Add HTML tags to the home page, copy the code, and log in to Wordpress backstage to find Theme( Appearance), Theme edit (Theme Edit), header.php.
Then stick the code to the head immediately below it, save it, go to the Mechant Center to verify the site on it.
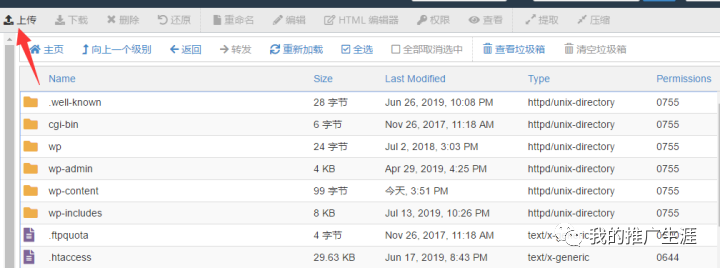
Upload the HTML file, download the HTML file first, then log into the background of the host service provider you're shopping for, and log into the Ccanel panel (the root of the file is found without the panel). Click upload your HTML file and you'll be able to verify your website at Mechant Center.
Brand: upload the logo of the website, at present most people do not go to get, because the feeling is not much use.
3, add taxes, add shipping charges
Here's an example of the United States as a target country:
Taxes: If you don't plan to pay taxes, choose "No direct tariffs for all states"

Shipping: Add the service, and then fill in the United States, note that the charge for freight is exactly the same as the one set up on the surface of their own website, for example, the website is set up on the parcel, then this must also be the parcel.
Shipping areas, if you have some U.S. states that don't ship, can be set up here. If all the states are shipping, you can take it into care.

4, upload Feed, extract Feed
In fact, both Shopify and Wordpress have plug-ins to help you upload items without having to make your own Feed, for example: Shopify stores can use Google shopping feeds, Wordpress stores can use google shopping plug-ins.
But if you don't have a lot of items, my personal advice is to make your own Feed form, because you can supplement the Feed as much as possible to make your shopping ads run more effectively.
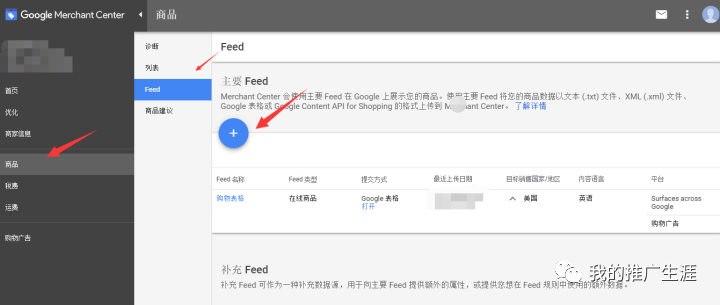
This step is the top priority, click on the item on the left, feed, then click Add, select the Gogle table.
Google 表格里面像 id, title , description, link, condition,price,availbility,image link,gtin,mpn,brand,google product category 这些都是比较填写的。
Google product category is Google has divided all the products on the market into different ids, you need to know which id your products correspond to.
Google prodcut category product classification form download address:
http://www.google.com/basepages/producttype/taxonomy-with-ids.zh-CN.xls
The most important of which is gtin, mpn, brand this three elements, google requirements must fill in two of them, then we generally choose to fill in mpn and brand, mpn you can fill in the ANG, brand can fill in the name of the shop, note that after filling in this, you also need to add an element identifier_exists, fill in FALSE.
The feed file is processed and you need to find an immediate extract so that Google will immediately review whether your Feed file can be advertised.

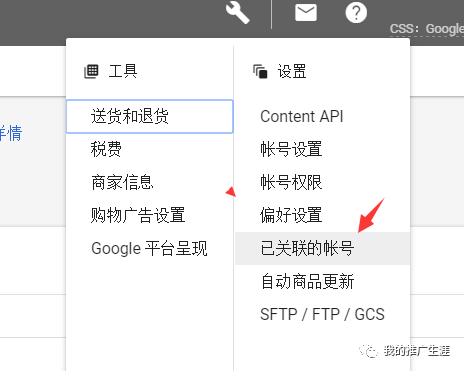
5, Google merchant center account binding ads account, in the mercant center background, click on the settings in the upper right corner, the associated account, and then select Google ads account to bind, note, finally you need to log in to your google ads background, consent binding.
6, run shopping ads
After these steps are done, you can go backstage to Google ads, add new campaigns, choose sales, shopping ads on it. The optimization of shopping ads involves keywords, addition of custom tags, different bid levels, bidding strategies, and so on, which will be written in the tutorial paper, if you have questions can comment contact.
Go to "Discovery" - "Take a look" browse "Friends are watching"